Basic Scaling, Animation, and Parallax in Pixi.js v3

A basic challenge in mobile games is dealing with varying screen sizes and resolutions. This post is a quick demo and writeup playing with the Pixi.js 2D graphics library for HTML5 games, showing how to scale a fixed-size game worldview to fit a given display, whether it be a device screen or a container on a page. In doing so it leverages some Pixi features to use upscaled resources for Retina and other high resolution displays. The demo also illustrates some basic mechanisms for sprite animation and parallax scrolling in Pixi v3, as well as preparing spritesheets using TexturePacker.

Questions are best posted to the HTML5 Game Devs Pixi forum, where many people, including Pixi.js developers, may answer them. But I’ll attempt to address any raised in the comments here. Suggestions and corrections are of course also welcome!

Flappy Monster

The demo is running here, or you can load it on its own, or view the source:

If everything has worked, there should be a monster endlessly flying across the screen as background and foreground graphics scroll along.

Aspect Ratio

The goal here is a common game design in which either the conceptual game world has a fixed size and is viewed in its entirety, or there is a fixed-size view into a larger conceptual game world. In either style that view is then scaled when drawn to fit the screen or display space as best as possible without cutting anything off or changing the aspect ratio (width divided by height). This frequently results in the “black bars” seen in videos or many mobile games, as part of the display is unusable unless the aspect ratios of the view and available display space match.

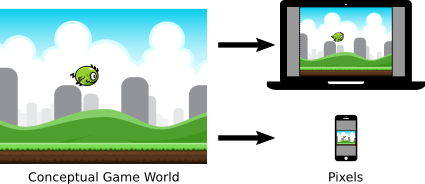
The fixed-size conceptual world, or a view of it, is mapped to the pixels of the display in use.

The fixed-size conceptual world, or a view of it, is mapped to the pixels of the display in use.

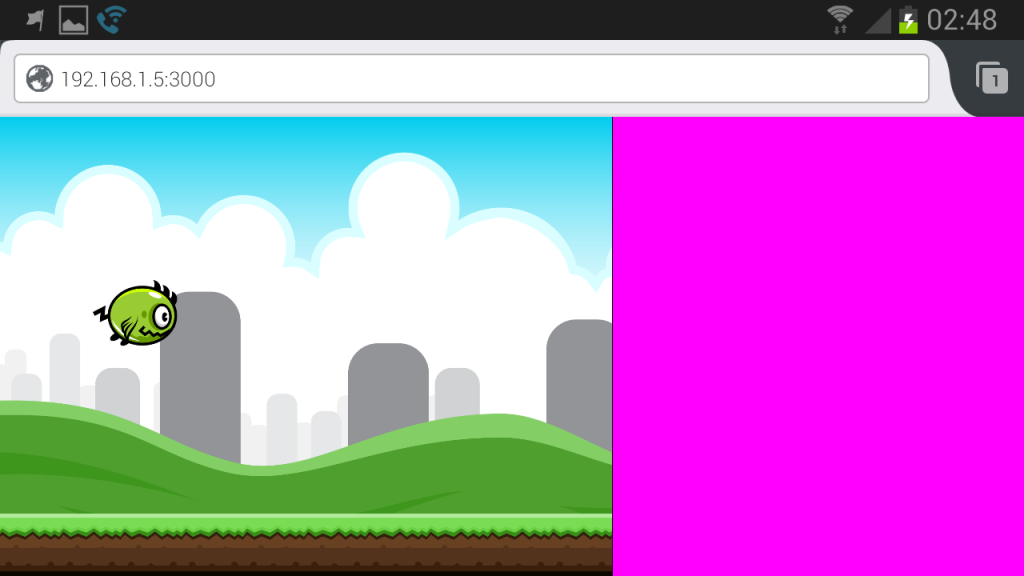
This demo has a conceptual world of 800×600 units, viewed in its entirety. When the monster flies off the screen and wraps around, it’s moving in and testing against a world 800 units wide. The instance displayed above has been fixed to a display of 480×360 pixels and the drawing scales accordingly. There is no dead space because the aspect ratios match. If you bring up the demo by itself in your browser, it will scale to fill the screen and re-scale if you change the window size. On my Samsung S3 it does the same according to my current device orientation:

Landscape orientation.

Landscape orientation.

Portrait orientation.

Portrait orientation.

The pink areas there are the dead “black bar” spaces that can’t be utilized without changing the aspect ratio or cutting off content. In an actual game these would be actually black, or house some decorative graphics or even game UI elements.

Renderer & Scaling

The demo instantiates a Pixi renderer and a top level stage container as follows:

        var rendererOptions = {
          antialiasing: false,
          transparent: false,
          resolution: window.devicePixelRatio,
          autoResize: true,
        }
        
        // Create the canvas in which the game will show, and a
        // generic container for all the graphical objects
        renderer = PIXI.autoDetectRenderer(GAME_WIDTH, GAME_HEIGHT,
                                           rendererOptions);

        // Put the renderer on screen in the corner
        renderer.view.style.position = "absolute";
        renderer.view.style.top = "0px";
        renderer.view.style.left = "0px";

        // The stage is essentially a display list of all game objects
        // for Pixi to render; it's used in resize(), so it must exist
        stage = new PIXI.Container();

        // Size the renderer to fill the screen
        resize();

        // Actually place the renderer onto the page for display
        document.body.appendChild(renderer.view);

        // Listen for and adapt to changes to the screen size, e.g.,
        // user changing the window or rotating their device
        window.addEventListener("resize", resize);

Scaling of the display is encapsulated in a function so that it can be called each time the screen changes, i.e., the window is resized, the game is sent fullscreen, or the device flips between portrait and landscape:

      function resize() {

        // Determine which screen dimension is most constrained
        ratio = Math.min(window.innerWidth/GAME_WIDTH,
                         window.innerHeight/GAME_HEIGHT);

        // Scale the view appropriately to fill that dimension
        stage.scale.x = stage.scale.y = ratio;

        // Update the renderer dimensions
        renderer.resize(Math.ceil(GAME_WIDTH * ratio),
                        Math.ceil(GAME_HEIGHT * ratio));
      }

Note that the autoResize option set in creating the renderer does not automatically install an event handler like this. Instead, it controls whether or not the CSS dimensions of the renderer are also set when its dimensions are changed, which is important in the next section.

All together, this code creates a Pixi renderer, then resizes it and scales the graphics to best fill the available display space.

The first step in that resizing is calculating the scaling ratio, as determined by the most constrained axis. The ratios between each of the horizontal and vertical screen dimensions and the corresponding game worldview dimensions are compared, with the least ratio defining the most we can scale the game: That worldview dimension times the ratio equals the screen dimension. Note that in general this is not quite as simple as picking the smaller screen dimension and dividing, because of how game and screen aspect ratios may compare; e.g., a very tall game could be constrained by the height even in portrait orientation despite that being the long axis.

The stage is then simply scaled by that ratio. As it contains all of the objects to be drawn, this factor will be applied to every object as they’re drawn, scaling them from the game world to the screen.

Finally, the on-page renderer itself is resized to fill the most constrained dimension.

At this point, the game will scale appropriately on desktops to fill available space.

Viewports

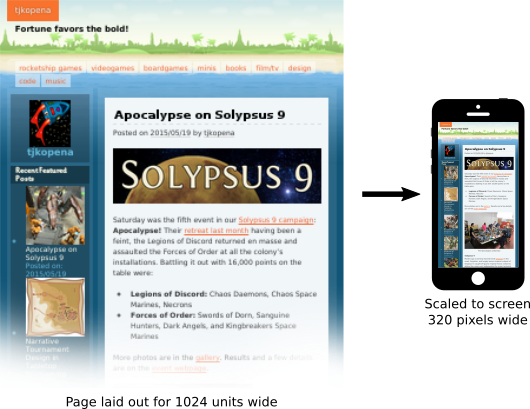
The next complication is managing browser viewports. Historically, a real issue in web design developed when smartphones initially became widespread. With their small screens and few pixels, web pages designed for typical desktop displays simply didn’t look or work correctly if laid out to the tiny handheld dimensions. So a viewport was introduced to the browsers. Exactly similar to the world scaling above, pages were laid out to conceptual dimensions similar to a desktop display to produce their expected look, and then scaled down when drawn on screen. This mapping step also enables other features, such as the page layout not continually changing as the user zooms in or out.
Viewports decouple page dimensions and layout from actual device display limitations or capabilities.

Viewports decouple page dimensions and layout from actual device display limitations or capabilities.

A consequence of the viewport is that by default the page dimensions visible to the game code on mobile devices may have little direct bearing to the actual physical display. They also vary widely by browser and device. The viewport meta tag must be used in the page’s head to direct the browser to report the actual screen dimensions and to not scale the page display:

    <!-- Viewport meta tag is critical to have mobile browsers
         actually report correct screen dimensions -->
    <meta name="viewport"
          content="width=device-width, initial-scale=1, user-scalable=no" />

The three options there respectively tell the browser to set the viewport as the same size as the screen, not to scale it, and not to let the user scale it either. With that specification the browser will report the screen dimensions, and the earlier code will scale the game appropriately even on mobile devices. Success!

Hi-Res

The next step is accounting for pixel density. Most upper end mobile devices today actually have many pixels compared to traditional displays, even if the screens are physically still small. The browser variable window.devicePixelRatio reports this resolution. On standard desktop displays it’s a 1, and on high resolution displays such as a smartphone it will typically be 2 but perhaps another value.

The code above already accounts for pixel density in its calculations. Despite the viewport settings, mobile browsers still don’t report the actual screen dimensions via window.innerWidth and window.innerHeight, but instead a virtual page size scaled from the screen by the inverse of window.devicePixelRatio. So, in portrait mode with those viewport settings, a Samsung S3 reports a window width of 360 units even though the screen is 720 pixels wide. However, the device pixel ratio is passed to Pixi via the resolution renderer option, which scales the canvas to compensate.

Another consequence of high resolution devices is that images may deteriorate when scaled to suit those large pixel counts. Sometimes this isn’t a problem, but Pixi makes it easy to swap in higher resolution assets when appropriate. In loading an image or spritesheet, if Pixi detects an “@2x” in the filename, it interprets the asset as a high resolution graphic; e.g., in loading the monster:

        if (window.devicePixelRatio >= 2) {
          loader.add("monster", "monster@2x.json");
        } else {
          loader.add("monster", "monster.json");
        }

From there the game code can largely forget about this detail. In particular, the sprite’s width and height are adjusted by that resolution and report the same dimensions as the standard version. Internally though, between Pixi and the browser, when the graphic is rendered, the high resolution source image entails that the image does not have to be scaled (as much) to output to the high resolution device, resulting in a crisp(er) image. In the code above, the autoResize renderer option is needed to have Pixi adjust the canvas element’s CSS styling in order to make this work correctly.

Standard and hi-res spritesheets for the flappy monster.

Standard and hi-res spritesheets for the monster.

Animation

With the renderer set up appropriately and the spritesheet loaded, it is then easy to display and animate the monster. For this trivial demo, several global variables are created, along with a hardcoded list of frame names defined in its spritesheet:

      var monster;
      var FRAMES = [
        "frame-1.png",
        "frame-2.png",
        "frame-3.png",
        "frame-4.png",
      ];
      var frameindex;
      var frametime;
      var FRAMERATE = 0.08;
      var VELOCITY = 100;

The monster is then instantiated, taking the first frame as its initial texture:

        // Create the monster sprite
        monster = new PIXI.Sprite(PIXI.Texture.fromFrame(FRAMES[0]));
        frameindex = 0;
        frametime = FRAMERATE;
        monster.anchor.x = 0,5;
        monster.anchor.y = 0.5;
        monster.position.x = -monster.width/2;
        monster.position.y = GAME_HEIGHT/2 - monster.height/2;
        stage.addChild(monster);

Note that the monster is positioned within the game world dimensions, not the screen dimensions. Because the resolution is automatically set on the graphic and its dimensions adjusted appropriately, and we’re retrieving the texture by the frame name in the spritesheet rather than the image filename, the detail of whether or not a high resolution asset is in use can be ignored. Additionally, because the standard image size is keyed to the conceptual game world dimensions, we can simply use that in centering and moving the monster.

A standard HTML5 animation loop is then established, calling an update and render function as fast as possible while matching the framerate of the display:

        // Prepare for first frame of game loop/animation
        lasttime = new Date().getTime();
        requestAnimationFrame(animate);
      function animate() {

        // Determine seconds elapsed since last frame
        var currtime = new Date().getTime();
        var delta = (currtime-lasttime)/1000;

        // Scroll the terrain
        background.tilePosition.x -= BG_RATE*delta;
        foreground.tilePosition.x -= FG_RATE*delta;

        // Move the monster
        monster.position.x += VELOCITY*delta;
        if (monster.position.x > GAME_WIDTH + monster.width/2) {
          monster.position.x = -monster.width/2;
        }

        // Animate the monster
        frametime -= delta;
        if (frametime <= 0) {
          frameindex++;
          if (frameindex >= FRAMES.length) {
            frameindex = 0;
          }
          monster.texture = PIXI.Texture.fromFrame(FRAMES[frameindex]);
          frametime = FRAMERATE;
        }

        // Draw the stage and prepare for the next frame
        renderer.render(stage);
        requestAnimationFrame(animate);
        lasttime = currtime;

      }

This function first moves the monster within the game world space, wrapping it around the edges. Rather than directly adding to its position, the monster has a velocity of 100 pixels per second. Multiplying that by the time elapsed since the previous frame and adding to its position calculates the monster’s new location in the game world. Applying this trivial kinematic formula deals with changes in frame rate and the update cycle on different devices and under varying processor loads, ensuring the monster always moves consistently.

The other component is a simple timer which triggers the monster’s texture being set to the next frame in its animation sequence every fraction of a second. This loops through the list of frames, producing the flapping animation. Pixi does include a MovieClip sprite component for doing basic animation in the same way, but many games require more direct access and manipulation of the animation, built on similar code as that here.

Parallax Scrolling

The monster of course needs a world to fly in. For this demo and even many basic games, it’s enough to have a simple image scrolling past. Pixi supports this readily via tiling sprites. The demo uses two of these, a background and a foreground, scrolling at different rates to create the illusion of depth via parallax, whereby the apparent positions of objects at a distance shift more slowly as the viewer moves.

These tiling sprites are instantiated and added to the display similarly to a regular Pixi sprite. One difference is that they take explicit width and height parameters defining the tiling sprite’s dimensions. The source graphics are then pattern repeated within that sprite as necessary to create the rendered image. In this demo the background sprite is sized to fill the whole screen, while the foreground is a single strip placed along the bottom edge:

        // Create the scrolling background
        background =
          new PIXI.extras.TilingSprite(PIXI.loader.resources.background.texture,
                                       GAME_WIDTH, GAME_HEIGHT);
        stage.addChild(background);

        // Create the scrolling foreground tile
        foreground =
          new PIXI.extras.TilingSprite(PIXI.loader.resources.foreground.texture,
                                       GAME_WIDTH,82);
        foreground.position.y = GAME_HEIGHT - foreground.height;        
        stage.addChild(foreground);

Within the animation loop, the starting position of that pattern is then adjusted to make the images scroll:

        background.tilePosition.x -= BG_RATE*delta;
        foreground.tilePosition.x -= FG_RATE*delta;

The monster now appears to be flying above some grassy ground, with hills and towers in the distance behind!

Composition of the scene.

Composition of the scene.

Assets

Finally, a note about assets and how they’ve been prepared.

The monster and background are both open game art by Bevouliin. Thanks to Bevouliin for publishing these great graphics for all to use!

The images were published as quite large raster graphics, which have been downsampled here for standard and double size hi-res versions to match the conceptual game world of 800×600. This was done using ImageMagick, e.g.:

mkdir sm
for i in frame-*.png; do convert $i -scale 10% sm/$i; done

The monster frames were then packed into spritesheets using TexturePacker, whose basic JSON texture atlas format Pixi understands. The images and atlas can be generated by the trial version with a command such as:

TexturePacker --png-opt-level 0 --algorithm "Basic" \
              --disable-rotation --trim-mode "None" \
              --format "json" --data monster.json   \
              --sheet monster.png                   \
              sources/monster/Transparent\ PNG/flying/sm/*

Note that the monster frames have been put into separate directories for standard and hi-res versions. The frame names derived from the filenames are then identical in both versions of the texture atlas, so the animation indexes are the same regardless of the display mode. The background graphics are simply different files for standard and hi-res versions. However, by using the resource handler created by Pixi’s loader rather than the image URLs, their instantiation code also does not have to be concerned with the display mode. See the source for these details.

Conclusion

That wraps up this simple demonstration. The full code is available here. Check out the Pixi v3 examples and documentation for more information about all the things it can do, and don’t forget about the HTML5 Game Devs Pixi forum.
pixiv3-898x342

Asteroids: Moving Objects

Recently I’ve started mentoring a local high school student a bit on implementing a video game, and this is a technical note toward that.

How objects move in simple arcade and action games is usually fairly straightforward, nothing more at the core than basic trigonometry and physics.

Game Loop

Most action games are a kind of real-time simulation, the core of which is a loop that updates essentially the entire world, all the objects and environmental effects in it, each cycle. That cycle is usually driven directly or indirectly by the frame rate, how many times a second the video display can or should be updated. Modern action games generally target 30 or 60 frames per second (FPS).

The relationship between frames and updates can get complex, but here we’ll assume we simply want to draw frames as frequently as possible and will update the world each time. A key detail even in this simple setup though is that a variable amount of time may pass between each update: The program will execute at different speeds on different computers, may slowdown if many other programs are open, and so on. We therefore need to account for that time in the update, so that the game plays basically the same in different environments.

The core of a typical action game program is then a loop that looks something like:

  While playing
    Calculate elapsed time since last update
    Update each object in the world by the elapsed time
    Render the current world

Calculating the elapsed time is a simple task of polling the computer’s clock. At the start of the program, the variable is set to the current time. Each update cycle, that variable is subtracted from the current time to give the elapsed time. The variable is then set to the time for this update cycle.

Rendering the world can use a wide variety of techniques, e.g., looping over all the game objects and applying a polygon drawing technique as discussed last time.

This rest of this post addresses moving objects in the world update.

Straight Line Movement

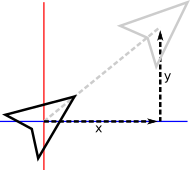
Moving in a straight line is a simple matter of displacing an object, shifting its x and y position.

ship-move

In practice, game updates may happen at slightly different intervals each frame, so it’s not quite as simple as merely adding a fixed value each cycle. Instead, the object is given a velocity which is multiplied by the time interval since the last frame to calculate the object’s displacement over that period.

x' = x + xvel*time
y' = y + yvel*time

Here x and y are the current position of the object, xvel and yvel the two axis-components of its velocity, and x',y'is the updated position of the object.

To set the object moving in a given direction, we simply set xvel as the cosine of that angle times the speed we desire, and yvel as the sine times the speed.

xvel = cos(angle) * speed
yvel = sin(angle) * speed

As discussed previously, keep in mind that most computer trigonometry functions operate on radians rather than degrees, and because the y-axis points downward, counter to typical conventions in mathematics, 90 degrees actually points down-screen.

Inertia

For objects that don’t change direction, the above is all that’s needed. Others, like the player’s ship in Asteroids, need to change velocity, e.g., in response to player input. In most games the player doesn’t change direction immediately but instead has some inertia, slowly moving from one direction to the next rather than just jumping to a new direction immediately. This is yet another reason to base movement around velocities and simple physics rather than fixed displacements or other schemes. Many games will additionally model acceleration to easily incorporate concepts like the drag of moving on a surface eventually slowing an object to a halt, or gravity speeding an object down to the ground when it falls.

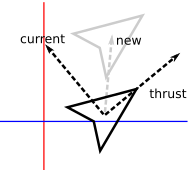
The precise implementation and numbers used are some of the key elements defining how a game feels to play, and entire tomes have been written about these primitive physics in classic games, e.g., for Sonic or Mario. In many games inertia is fairly subtle. In Asteroids though it’s an overt, characteristic feature. The player’s ship moves as though it’s in space, gliding along endlessly with no friction to stop it, simply rotating in place until thrust is applied to change course. A simple way to do this is to track which direction the ship is currently facing, and manipulate that whenever the player hits the keys to turn. The keys to thrust forward and backward then simply trigger computing a velocity for the current direction, which is added to the current velocity.

xvel' = xvel + cos(angle) * thrust
yvel' = yvel + sin(angle) * thrust

Where thrust is the acceleration to apply. This is effectively taking the current vector of the ship, the new vector the player wants to move in, and adding them together to produce an updated vector reflecting the thrust applied to the ship’s inertia.

ship-inertia

Regulate Velocity

To keep the gameplay sane we need to cap the ship’s speed at some amount. Unfortunately we can’t just check to see if either velocity component has gone beyond a bound, because then the ship’s movement will be fixed in just that axis and it will move very oddly. Instead, we need to check if its speed—the magnitude of the velocity vector—is too high, and adjust its velocity accordingly. We do the latter by normalizing it, identifying the fraction of its speed contributed by the velocity’s x and y components, and multiplying that by the maximum speed we want to produce new, reduced x and y components that together fall within the bounds.

len = xvel^2 + yvel^2         // Compute length of the vector squared;
if len > max^2 then           // If we're moving too fast;
  len = sqrt(len)             // Compute the length;
  xvel' = (xvel / len) * max  // Normalize the components and multiply
  yvel' = (yvel / len) * max  // by our target max speed.
end

Note that we compare against the square of the maximum speed because computing a square root, to get the actual length, is traditionally a time-consuming calculation, though for this example it doesn’t matter. We therefore only want to compute it if necessary, and compare instead against the square of the bound we want to impose, a computationally cheap calculation to make.

Screen Wrap-Around

Finally, a critical part of basic movement is how objects interact with the boundaries of the world, which are often simply the screen itself. That in and of itself is a major question: Is the game world bigger than a single screen? Related questions further define critical basic behavior: Does the object stop at a world edge? Bounce? Wrap around to the other side? Does it have different reactions at different edges? As one small example of the latter, my little arcade game Gold Leader gives the player more tactical options, makes the screen feel bigger, and gives gameplay an interesting twist by wrapping the player around the x-axis but bounding them along the y-axis, whereas most similar games stop them at the edge of both.

In Asteroids, objects wrap around both edges of the single-screen world. This is handled through a simple series of checks and shifts in position.

if x < 0 then
  x += screenwidth
else if x > screenwidth
  x -= screenwidth

if y < 0 then
  y += screenheight
else if y > screenheight
  y -= screenheight

Note the additions and substractions. It can be jarring to just set the ship to the opposite side once it crosses over an edge. Hardly ever will the ship land exactly on an edge within a frame, instead it will typically have moved several pixels beyond. Adding and subtracting the dimensions preserves that slight difference and helps ensure the movement is visibly smooth.

Implementation

All of the above has been implemented in this little demo. Click on the game below to give it focus or follow that link, and then drive the ship with the arrow keys.

You can view the source to see the elements above implemented.

Walking With A Ghost

Sometime recently a new trailer went up for the Space Hulk: Deathwing video game. It’s pretty good:

Some of the guys have been discussing whether or not the unexpected musical selection, Kadebostany’s Walking With A Ghost, works. Juxtaposing action games with slower or offbeat music has definitely been a thing since at least the very successful, memorable, and beautiful “Mad World” trailer for Gears of War:

Given that Space Hulk: Deathwing is a Games Workshop licensee, it’s tempting to quickly dismiss the latest trailer as simple mimicry given GW’s general ineptness and the low quality of many of the offerings from both it and its licensees. However, I think the game studio developers quite possibly put a lot of thought into that selection, and that it comes close to inspired.

Synchronization

First, note how the whole video is well keyed to the music. That’s not coincidental, and took more than just slapping the song over the video. As a counter-example, note how easy it would have been to just throw Mad World over the Gears trailer. Although I don’t actually believe little effort went into tailoring that video to that music, it could have. That song doesn’t have a ton of really distinctive audio shifts, peaks, or valleys, and the action on the video is pretty subdued. They would basically work together no matter what, with no effort to sync them up. It takes a fair bit of close watching to actually pick up a few subtle touch points:

  • When the lyrics go “Worn out places, worn out faces” as the clip pans from the rubble to the face of first the demolished angel statue and then has its first closeup of the face of the soldier (starting at ~9s);
  • The lyrics go “No tomorrow, no tomorrow” as the soldier runs into the dying light, the video fades out, and then comes back in on yet more endless rubble and running (starting at ~22s).
  • Of course the closing, with the “Mad world” chorus as the hero leaps from a minor potential confrontation with a vaguely humanoid enemy into a hopeless situation in a demonically lit setting against truly otherworldly aliens (~40s).

In contrast, Walking With A Ghost has a couple pace changes and definite valleys, all of which the Space Hulk trailer video is keyed to. Several are pretty overt:

  • ~40 seconds in when the music picks up and the video goes from a setting pan and ultra slow motion to live combat;
  • ~70 seconds in, the music slows down again as the video slows to show the Tyranids bringing in reinforcements;
  • ~75 seconds in, the music picks back up into a more flowing style with horns giving a feeling of a Spanish bullfight or Mexican swashbuckling scene while the action picks back up, having switched to swirling swords and close combat until seguing to end with a last stand on steps vaguely reminiscent of a cathedral.

All in all, the video seems to have been certainly choreographed to the music and at a minimum the latter not just cynically slapped on in a cheap ploy to stand out or evoke some gravitas and intellectual veneer.

Lyrics

A few connections though are more subtle and tied to the lyrics, e.g.:

  • ~55 seconds in, “Round and round and round” as flames and the camera swirl around a Terminator;
  • ~64 seconds in, “I’m not creatin’ my flow with my ego” as the camera pans over a pretty solid symbol of ego, a powersword inscribed with “I am wrath. I am steel. I am the mercy of angels.”

With that, it’s worth looking at the full lyrics of the song:

I’m just walking with a ghost
And he’s walking by my side
My soul is dancing on my cheek
I don’t know where the exit is

Every day is still the same
And I don’t know what to do
I’m carrying my tears in a plastic bag
And it’s the only thing I got from you

I have short hair
And I’m faced with a few complications
So, so if you care
Try to analyse the situation
You know, man
As the leaves fall on the ground
My soul is goin’
Round and round and round

So please, do it well
Just break the spell
Why don’t you do it right?
I don’t want another fight
I’m not creatin’
My flow with my ego
I’m taking off my hood
And I’m entering deeply in the wood
You know, man

Bugs are my only food
And it puts me in a strange mood
I ain’t giving you my heart
On a silver plate
Why couldn’t we be just mates?
Oh no, never come back to me

I wish i could be a child, write me another dance, another chance, another romance
we could just be friends

I wish i could be a child, write me another dance, another chance, another romance
it could be the end

Accepting a fair dose of lyricism, that actually captures and references an awful lot about a Space Marine’s life, especially those fighting in a space hulk.

It starts with the opening lines:

I’m just walking with a ghost
And he’s walking by my side

What does a Space Marine do but trudge along with the Emperor’s will aiding his every move and his spirit foremost in the Marine’s mind?

Bouncing around a bit, there’s a middle stanza about the Marines’ monastic lifestyle and how their dedication to the Emperor and setting aside of themselves is what gives them their strength as they wade into combat against tremendous odds in dark, unknown enemy territory:

I’m not creatin’
My flow with my ego
I’m taking off my hood
And I’m entering deeply in the wood

Toward the end, it turns out we’re specifically hearing from a Space Marine fighting, probably until he dies, with Tyranids—the bugs of this particular franchise:

Bugs are my only food
And it puts me in a strange mood
I ain’t giving you my heart
On a silver plate
Why couldn’t we be just mates?
Oh no, never come back to me

Most dramatically though, most of the song captures what I take as an overarching theme of the Space Marines:

I don’t know where the exit is

Every day is still the same
And I don’t know what to do

My soul is goin’
Round and round and round

So please, do it well
Just break the spell
Why don’t you do it right?
I don’t want another fight

I wish i could be a child, write me another dance, another chance, another romance
we could just be friends

These lines are all about one of the central pathos of the Space Marines. They’re in many ways the pinnacle of humanity. It’s not generally readily apparent from the actual games, but these guys are all ostensibly artists and scholars without par. They’re brilliant, talented, dedicated, create great works while traveling between battles, and have built and maintain the greatest, most human, most advanced worlds and societies remaining in the Imperium of Man. But by and large, they spend all their time locked in a deathgrip with the universe, dying easily and frequently in endless combat in order to defend humanity, often times from itself.

That’s a key part of the appeal of the faction to me: Those Marines that haven’t become completely inured and numbed to that role must realize the deep tragedy of their lives. The brightest and most foresighted must futilely long for a way out of all the fighting, an impossible cessation of endless, all-consuming war. Though their personal specifics are lost to them through their conditioning (presumably—the fluff’s a bit contradictory), some of them must yearn to go back before they were inducted, when they were still children leading simple lives, unconcerned about the fate of humanity and not facing constant pain and death.

So, I would argue that even besides the choreography, the lyrics of the song actually make it an appropriate choice as well.

Conclusion

I figure there’s half a chance the producers of the trailer really did just throw on a cool song they heard that would maybe help their trailer stand out. That said, there’s little denying the whole video has been crafted around that selection. The choreography is too tightly synced, to music that decidedly requires it. At a minimum they weren’t just crassly thrown together with no effort.

At a maximum, the piece was actually chosen with some thought as to the lyrics and what’s going on in this fictional universe. Obviously all of the textual reading above is bullshit and nonsense. But it’s at least as valid as any literary interpretation out there, and I could believe it occurred to a developer if they happened to be actual fans and devotees of the 40k universe.