Recently there’s been a lot of hoopla about software used to construct army lists. I’ll (mostly) ignore for now the obvious irony in Lone Wolf attacking people for IP violations. As a case in point though, check out this graphic from their store page:

All that aside, I’ve never really seen the appeal. Admittedly, Lone Wolf’s Army Builder produces spiffy reports that would otherwise take a fair bit of time to do up—I know, I’ve spent a good bit of time LaTeXing fancy looking roster sheets myself. But for $40? A simple spreadsheet using software you already have or can get for free (e.g., OpenOffice), would seem to fill the bill nearly as well, as compared to shelling out basically the price of a whole squad or vehicle model.
I thought I’d note a couple tips on how I set up my spreadsheets. No rocket science, but maybe useful for people not as familiar with Excel or similar programs. I use OpenOffice Calc mostly, but everything should carry over directly to Excel, and I’ve noted differences of which I’m aware.
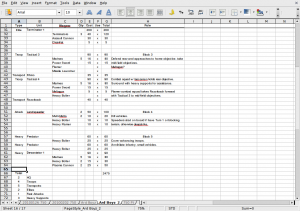
This is my basic format; note that I’ve sized the columns appropriately so it all fits in a portrait printout and I get as many units as possible onto one page:

First, note that I’ve got a ton of tabs. When I create a list for a “serious” game, I copy a previous similar list into a new worksheet tab in the file and work from there. That way I have one organized place with all the different lists I’ve used. There are two reasons for this: 1) It’s sometimes nice to go back and look up what list I used for a particular match. 2) It makes it easier to copy and paste different setups. For example, the next time I run Terminators in a list I can just tab over and copy their entry from one of my ‘Ard Boyz lists.
Another note is that I’ve set the header row to be in view no matter how I scroll down. This makes everything much easier to read. You can do this by selecting the row just below the one(s) you want visible, then hitting Window->Freeze Panes in the menu bar.
Somewhat unfortunately, frozen rows (or columns) aren’t put on each page of a print out. To do that you need to establish a repeating print range. In OpenOffice you can do that by going to Format->Print Ranges->Edit Print Range and entering the rows you want to repeat on each page. There are some notes on that here. In Excel you do that via File->Page Setup->Sheet->Print Titles and entering the rows you want. These let you tell the software to include the frozen header row on every page of your print out as well, not just the on-screen display.
Next, I have a bunch of different columns:
- Type: The standard unit types—HQ, Troop, Transport (for non-FOC Dedicated Transports), Elite, Fast Attack, and Heavy Support. I abbreviate the latter as Attack and Heavy so the column can be smaller and have less whitespace in the other types.
- Unit: The unit, with a designator when appropriate, e.g., “Tactical 3.”
- Wargear: I use this column to itemize upgrades purchased for the unit. I could do this in the Unit column, but splitting it out makes for nice indentation and easier visual management.
- Qty: How many of that item I am buying. This mostly applies to Wargear or Squadrons. A blank is assumed to be ‘1’.
- Cost: How many points one item of that type costs, e.g., 90 for the initial 5 Marines in a Tactical Squad, or 5 for a Sternguard Combi-Melta.
- Use: Whether or not I’m using the item in this list; an “X” mark here means yes. I’ll return to this in a second.
- Total: How many points this item costs in total, i.e., quantity times cost.
- Role: A place to put notes for myself on what I’m planning to do with that unit.
The Role column is obviously not critical, but can really help in working on and planning a list over time, e.g., for a big tournament. This is a simple addition that I’ve found has really helped focus my thinking about my units: What I want them to achieve, whether or not they’re worth it, and sticking to the plan in-game.
Somewhat similarly to the Role column, in working on a big list over time I frequently also add a column to track a unit’s status, i.e., purchased, assembled, painted, etc.
Now on to the slightly more interesting stuff…
I like making lists, and spend a decent amount of time before big games working out what I want to use. The Use column lets me experiment with that and quickly try out different combos. Basically, the Total column is only calculated if the item is marked as being used. This is done by filling the Total column with a formula like this:
=IF(F3="x";IF(D3=0;1;D3)*E3;0)
In that formula, F is the Use column, D the Qty column, and E the Cost. This is from the third row, hence F3, D3, E3. You can enter the equivalent formula into the first entry in your Total column, and then copy it down the page by selecting all the rows you want it in and then hitting Edit->Fill Down. The row numbers will be automatically appropriately increased for each one.
What that formula says is that if the Use column does not have an “X” then the item is not in use and the Total for it is set to 0 so that it’s not included in my army sum. If the item is in use, then the Total is set to be Qty times Cost. The inner IF in the formula says that if Qty is blank, then it should be assumed to be a 1. This makes the whole sheet much more visually appealing and easier to read than if it had a 1 in the Qty column for the vast majority of entries.
That may all sound like overkill, but what it lets me do is very quickly pop units and wargear in and out of my list to try out different combinations and see if I can come in under the points total for the match. Not sure you want that Assault Cannon? Uncheck it, and see what your new total is. Think you might actually need it? Mark it again and change the quantity on extra Devastator Marines to cover the points. Checking or deleting the Use column for the items makes that much, much easier to do than messing around with deleting rows, copying and pasting, etc. Once the whole list is set I’ll delete the rows for unused items, but while it’s in development this little trick makes it much easier to play around with and think about.
Note that to help this work better and make the list more appealing, I’ve also set zeros to not be displayed. In OpenOffice you can do this by selecting the cells, right clicking, and entering a ‘#’ (without quotes) in Format Cells…->Numbers->Format Code. In Excel you can do this over the whole spreadsheet by unchecking Tools->Options->View->Zero Values. You can also set it for groups of cells by selecting them and then selecting Format->Cells->Number->Category->Custom and entering “0;-0;;@” (without quotes) in the Type of that same dialog tab.
Of course, then I also have the sum total points for every unit and item in use in the list. This is just a simple sum over the Total column:
=SUM(G2:G65)
In this formula, column G is the Total column. Remember that the range entries will be adjusted appropriately as you insert or delete rows in the list.
Finally, as a sanity check to make sure I don’t break some basic rules—I’ve several times nearly included too many Elites!—my sheet also counts and displays the number of units I have of each type. You can do this with a formula like:
=COUNTIF(A2:A66;"HQ")
Where column A is Type. This sums up all the items that have “HQ” as their Type. I have similar entries for Troop, Transport, Elite, Attack, and Heavy, as shown in the screen above. This is just a nice quick check to make sure everything’s kosher.
And that about sums it up. You could do fancier things, like enforcing that Type be one of the four classes, or myriad other tasks, but this works pretty well for me. The only thing I would like that it doesn’t do, and which would be a little tricky to implement well, would be to sum up and present the total for each individual unit with its wargear. Obviously you could insert sums for each one to do so, but that’s a bit of a hassle. This feature isn’t critical, but it is something I’d be interested in figuring out if someone with more Excel/OpenOffice experience (I have very little) has an idea. All in all though this basic setup has worked well for me. Feel free to leave comments if there are any questions or suggestions.
 One thing I discovered recently is that Haxe, via hxcpp, by default builds to a fairly old Android target platform. A consequence of this is that it uses software floating point emulation. But any Android device from ARM v7 on supports hardware floating point. Switching to this produces a dramatic speedup, assuming you’re ok with that requirement. To do so, use the


