Asteroids: Moving Objects

Recently I’ve started mentoring a local high school student a bit on implementing a video game, and this is a technical note toward that.

How objects move in simple arcade and action games is usually fairly straightforward, nothing more at the core than basic trigonometry and physics.

Game Loop

Most action games are a kind of real-time simulation, the core of which is a loop that updates essentially the entire world, all the objects and environmental effects in it, each cycle. That cycle is usually driven directly or indirectly by the frame rate, how many times a second the video display can or should be updated. Modern action games generally target 30 or 60 frames per second (FPS).

The relationship between frames and updates can get complex, but here we’ll assume we simply want to draw frames as frequently as possible and will update the world each time. A key detail even in this simple setup though is that a variable amount of time may pass between each update: The program will execute at different speeds on different computers, may slowdown if many other programs are open, and so on. We therefore need to account for that time in the update, so that the game plays basically the same in different environments.

The core of a typical action game program is then a loop that looks something like:

  While playing
    Calculate elapsed time since last update
    Update each object in the world by the elapsed time
    Render the current world

Calculating the elapsed time is a simple task of polling the computer’s clock. At the start of the program, the variable is set to the current time. Each update cycle, that variable is subtracted from the current time to give the elapsed time. The variable is then set to the time for this update cycle.

Rendering the world can use a wide variety of techniques, e.g., looping over all the game objects and applying a polygon drawing technique as discussed last time.

This rest of this post addresses moving objects in the world update.

Straight Line Movement

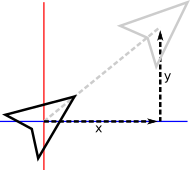
Moving in a straight line is a simple matter of displacing an object, shifting its x and y position.

ship-move

In practice, game updates may happen at slightly different intervals each frame, so it’s not quite as simple as merely adding a fixed value each cycle. Instead, the object is given a velocity which is multiplied by the time interval since the last frame to calculate the object’s displacement over that period.

x' = x + xvel*time
y' = y + yvel*time

Here x and y are the current position of the object, xvel and yvel the two axis-components of its velocity, and x',y'is the updated position of the object.

To set the object moving in a given direction, we simply set xvel as the cosine of that angle times the speed we desire, and yvel as the sine times the speed.

xvel = cos(angle) * speed
yvel = sin(angle) * speed

As discussed previously, keep in mind that most computer trigonometry functions operate on radians rather than degrees, and because the y-axis points downward, counter to typical conventions in mathematics, 90 degrees actually points down-screen.

Inertia

For objects that don’t change direction, the above is all that’s needed. Others, like the player’s ship in Asteroids, need to change velocity, e.g., in response to player input. In most games the player doesn’t change direction immediately but instead has some inertia, slowly moving from one direction to the next rather than just jumping to a new direction immediately. This is yet another reason to base movement around velocities and simple physics rather than fixed displacements or other schemes. Many games will additionally model acceleration to easily incorporate concepts like the drag of moving on a surface eventually slowing an object to a halt, or gravity speeding an object down to the ground when it falls.

The precise implementation and numbers used are some of the key elements defining how a game feels to play, and entire tomes have been written about these primitive physics in classic games, e.g., for Sonic or Mario. In many games inertia is fairly subtle. In Asteroids though it’s an overt, characteristic feature. The player’s ship moves as though it’s in space, gliding along endlessly with no friction to stop it, simply rotating in place until thrust is applied to change course. A simple way to do this is to track which direction the ship is currently facing, and manipulate that whenever the player hits the keys to turn. The keys to thrust forward and backward then simply trigger computing a velocity for the current direction, which is added to the current velocity.

xvel' = xvel + cos(angle) * thrust
yvel' = yvel + sin(angle) * thrust

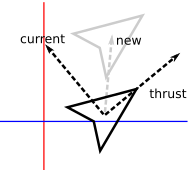
Where thrust is the acceleration to apply. This is effectively taking the current vector of the ship, the new vector the player wants to move in, and adding them together to produce an updated vector reflecting the thrust applied to the ship’s inertia.

ship-inertia

Regulate Velocity

To keep the gameplay sane we need to cap the ship’s speed at some amount. Unfortunately we can’t just check to see if either velocity component has gone beyond a bound, because then the ship’s movement will be fixed in just that axis and it will move very oddly. Instead, we need to check if its speed—the magnitude of the velocity vector—is too high, and adjust its velocity accordingly. We do the latter by normalizing it, identifying the fraction of its speed contributed by the velocity’s x and y components, and multiplying that by the maximum speed we want to produce new, reduced x and y components that together fall within the bounds.

len = xvel^2 + yvel^2         // Compute length of the vector squared;
if len > max^2 then           // If we're moving too fast;
  len = sqrt(len)             // Compute the length;
  xvel' = (xvel / len) * max  // Normalize the components and multiply
  yvel' = (yvel / len) * max  // by our target max speed.
end

Note that we compare against the square of the maximum speed because computing a square root, to get the actual length, is traditionally a time-consuming calculation, though for this example it doesn’t matter. We therefore only want to compute it if necessary, and compare instead against the square of the bound we want to impose, a computationally cheap calculation to make.

Screen Wrap-Around

Finally, a critical part of basic movement is how objects interact with the boundaries of the world, which are often simply the screen itself. That in and of itself is a major question: Is the game world bigger than a single screen? Related questions further define critical basic behavior: Does the object stop at a world edge? Bounce? Wrap around to the other side? Does it have different reactions at different edges? As one small example of the latter, my little arcade game Gold Leader gives the player more tactical options, makes the screen feel bigger, and gives gameplay an interesting twist by wrapping the player around the x-axis but bounding them along the y-axis, whereas most similar games stop them at the edge of both.

In Asteroids, objects wrap around both edges of the single-screen world. This is handled through a simple series of checks and shifts in position.

if x < 0 then
  x += screenwidth
else if x > screenwidth
  x -= screenwidth

if y < 0 then
  y += screenheight
else if y > screenheight
  y -= screenheight

Note the additions and substractions. It can be jarring to just set the ship to the opposite side once it crosses over an edge. Hardly ever will the ship land exactly on an edge within a frame, instead it will typically have moved several pixels beyond. Adding and subtracting the dimensions preserves that slight difference and helps ensure the movement is visibly smooth.

Implementation

All of the above has been implemented in this little demo. Click on the game below to give it focus or follow that link, and then drive the ship with the arrow keys.

You can view the source to see the elements above implemented.
Asteroids: Drawing Objects

Recently I’ve started mentoring a local high school student a bit on implementing a video game, and this is a technical note toward that.

Drawing basic shapes out of polygons to represent game objects is straightforward and requires just a bit of trigonometry, outlined here.

Shapes

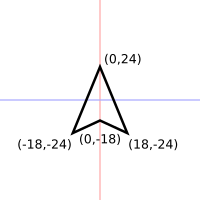
The core idea is that the polygon is located around the object’s current position. So, a standard looking Asteroids ship might be defined as four points about the origin as in this diagram:

Four coordinates defining a fairly standard Asteroids player ship.

Four coordinates defining a fairly standard Asteroids player ship.

The polygon is captured by a list (array) of points in order around the shape. Caveat other restrictions in the game’s code, it doesn’t really matter if they’re clockwise or counter-clockwise. In this case the ship is defined as follows, proceeding counter-clockwise:

  1. (0, 24)
  2. (-18, -24)
  3. (0, -18)
  4. (18, -24)

One cute trick that’s often done in Asteroids is to randomly generate the polygons for the asteroids themselves. The points list needs to be in order though or else the lines will overlap and the shape look funny. There are several ways to do this, but one is to go around in a circle, picking a random angle within that arc of the circle, picking a random distance from the origin for that tip of the rock, and computing the x & y value for that polygon point using that angle and distance.

Drawing

In most polygon graphics APIs, drawing starts by starting a new shape if necessary (i.e., newpath) and moving the cursor to the first point in the list (i.e., moveto). It then loops over each of the other points and draws a line from the previous position to the current point (i.e., lineto). The path is then either closed by drawing a line to the first point in the list from the last, or using a specific function to close the path if the API has one (i.e., closepath).

Rotation and Placement

Of course, in the game the object typically has to rotate and move. Rotation is simple because we’re taking the object’s current position as the origin of the polygon representing it. Each point to draw just needs to be calculated through the basic rotation formula:

x' = (x * cos(angle)) - (y * sin(angle))
y' = (x * sine(angle)) + (y * sin(angle))

In these formulas, x and y are the current point in the polygon list while x' and y' are the actual points to draw. The direction the object is currently rotated to, i.e.,which way the player is facing, is in angle.

This will draw the polygon around the origin, but of course the object is actually somewhere else on screen. This is a simple translation, effectively moving the polygon’s origin to the object’s actual position. In other words, just adding the object’s x and y coordinates to the point to draw:

x' = x' + objectx
y' = y' + objecty

Minor Complications

Although the ship above has somewhat naturally been modeled facing up, angle 0 in trigonometry is actually facing to the right. So, the polygon should instead be modeled with its natural direction facing that way.

Adding just a small detail, essentially all modern computer displays and most software use a slightly different coordinate system from what’s typically used in mathematics: The origin is at the top left of the screen, and the y axis increases going down the screen, not up. Note that this means the 90 degree angle is actually facing down and 270 degrees points straight up.

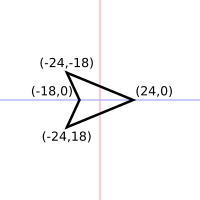
A wide variety of ways to work with these facts can be applied, but the easiest is just to model the polygon facing to the right and to keep that coordinate scheme in mind. So, the example polygon above would actually be modeled as follows:

The ship actually facing angle 0.

The ship actually facing angle 0.

The counter-clockwise ordering of points would then be:

  1. (24, 0)
  2. (-24, -18)
  3. (-18, 0)
  4. (-24, 18)

Another small detail to keep in mind is that nearly all trigonometry functions in software libraries are based on radians rather than degrees, though most people work more easily in the latter. Converting between the two just requires a simple formula based on the identity relationship between them:

radians = pi * degrees / 180

Code

A simple demonstration of this is in the box below. Pressing the left and right arrow keys make the ship rotate, and it’s being drawn in the center of the screen rather than the origin (you may have to click on the box first to focus the keyboard on it):

The code snippets for this below are in Javascript, but should be easily applicable to most platforms.

The polygon for the ship has been defined as follows:

var playershape = [
  { x: 24,  y: 0},
  { x: -24, y: -18},
  { x: -18, y: 0},
  { x: -24, y: 18},
]

It’s just an array of points, each a Javascript object with an x and y value. There is also a player object that has its own x, y, and angle, representing the player’s position and orientation on screen.

A couple trigonometry helper functions are defined, to convert degrees to radians, and to rotate x and y values:

function degtorad(angle) {
  return 3.1415926 * angle / 180;
}

function rotx(x,y,angle) {
  return (x*Math.cos(angle)) - (y*Math.sin(angle));
}

function roty(x,y,angle) {
  return (x*Math.sin(angle)) + (y*Math.cos(angle));
}

Note that each of the x and y rotations take as input x, y, and angle, because the rotation formula requires each of those values.

As discussed above, the ship is drawn by starting a path at the first point of the polygon, looping through each other point, and then closing it off. At each step the point to draw is rotated about the ship’s position as the origin, and then translated to the ship’s actual position on screen. This function captures that, and is called by the main drawing routine each time the ship needs to be displayed:

function drawplayer() {
  var x, y;  // These will be the point to draw.
  var i = 0;  // i is the current polygon point we're using

  ctx.beginPath(); // ctx is the graphics drawing context in this Javascript program.

  // Calculate the actual draw point by rotating and then translating.
  x = rotx(playershape[i].x, playershape[i].y, player.angle) + player.x;
  y = roty(playershape[i].x, playershape[i].y, player.angle) + player.y;
  ctx.moveTo(x, y); // Start the polygon at this point.

  // Loop through the other points---note that this therefore begins at point 1, not 0!
  for (i = 1; i < playershape.length; i++) {
    x = rotx(playershape[i].x, playershape[i].y, player.angle) + player.x;
    y = roty(playershape[i].x, playershape[i].y, player.angle) + player.y;
    ctx.lineTo(x, y); // Extend the path from the previous point to this new one.
  }
  ctx.closePath(); // Close the path by adding a line back to the start.
  ctx.stroke(); // Draw the path.
}

To initialize the player, its position is set to the middle of the screen and its orientation set as facing straight up:

  player.x = canvas.width / 2;
  player.y = canvas.height / 2;
  player.angle = degtorad(270);

Each time the left or right key is pressed, the ship’s angle is updated like this.

    player.angle -= degtorad(10); // Decrease the angle by 10 degrees, making the
                                  // conversion to radians first before subtracting
                                  // from the current angle.
    while (player.angle < 0) {        // This actually isn't necessary, but just makes sure
      player.angle += 3.1415926 * 2;  // the player's angle is always between 0 and 2*pi.
    }                                 // The drawing routines and other logic will all
                                      // handle that fine, but it can make things easier for
                                      // the programmer in writing other parts of the code.

Conclusion

Those are the basic elements in drawing a simple game like Asteroids. The next complication is having an array or arrays of game objects. That’s necessary to capture all of them that might appear on screen, namely the rocks and bullets. A drawing function like that above then needs to be applied to each game object in the array(s), rather than being just hardcoded to a single game object instance like this example is to the player’s ship.

Circle Intersection Test

Yet another quick test for a geometry function:

Click, drag, and release to draw a line. A point will be drawn at the intersections if there are any. Hit ‘S’ to toggle between treating the drawn segment as a line segments or a line.

The demo uses some basic Phaser features for the interaction and drawing. The Javascript code is:

var game = new Phaser.Game(530, 300, Phaser.CANVAS, 'container',
                           { create: create, update: update, render: render });

var line;

var setting;

var result1;
var result2;

var circle;

var segment = true;

function create() {

  line = new Phaser.Line(game.world.width/4, game.world.height/4,
                         3*game.world.width/4, 3*game.world.height/4);

  circle = new Phaser.Circle(game.world.width/2, game.world.height/2,
                             Math.min(game.world.height, game.world.width)/2);

  game.input.onDown.add(click, this);
  setting = false;

  result1 = new Phaser.Point();
  result2 = new Phaser.Point();

    game.input.keyboard.addKey(Phaser.Keyboard.S)
        .onDown.add(function() {
            segment = !segment;
        }, this);
}


function update() {

    if (setting) {
        line.end.set(game.input.activePointer.x,
                      game.input.activePointer.y);

        if (!game.input.activePointer.isDown) {
            setting = false;
        }
    }
}


function click(pointer) {
    setting = true;
    line.start.set(pointer.x, pointer.y);
}


function render() {
  game.debug.geom(line);

  game.debug.geom(circle, '#00ff00', false, 2);

  var res = intersection(line, circle, result1, result2, segment);
  if (res) {
    result1.x--;
    result1.y--;
    result2.x--;
    result2.y--;

    game.debug.geom(result1, '#ff0000');

    if (res == INTERSECTION)
      game.debug.geom(result2, '#ff0000');
  }

}


var NO_INTERSECTION = 0;
var INTERSECTION = 1;
var SINGLE_INTERSECTION = 2;
var TANGENT = 3;

function intersection(line, circle, result1, result2, segment) {
  var lx = line.end.x - line.start.x;
  var ly = line.end.y - line.start.y;

  var len = Math.sqrt(lx*lx + ly*ly);

  var dx = lx / len;
  var dy = ly / len;

  var t = dx*(circle.x-line.start.x) + dy*(circle.y-line.start.y);

  var ex = t * dx + line.start.x;
  var ey = t * dy + line.start.y;

  var lec = Math.sqrt((ex-circle.x)*(ex-circle.x) +
                      (ey-circle.y)*(ey-circle.y));

  if (lec < circle.radius) {

    var dt = Math.sqrt(circle.radius*circle.radius - lec*lec);

    var te = dx*(line.end.x-line.start.x) + dy*(line.end.y-line.start.y);

    if (segment) {
      if ((t-dt < 0 || t-dt > te) &&
          (t+dt < 0 || t+dt > te)) {
            return NO_INTERSECTION;
      } else if (t-dt < 0 || t-dt > te) {
          result1.x = (t+dt)*dx + line.start.x;
          result1.y = (t+dt)*dy + line.start.y;
          return SINGLE_INTERSECTION;
      } else if (t+dt < 0 || t+dt > te) {
          result1.x = (t-dt)*dx + line.start.x;
          result1.y = (t-dt)*dy + line.start.y;
          return SINGLE_INTERSECTION;
      }
    }

    result1.x = (t-dt)*dx + line.start.x;
    result1.y = (t-dt)*dy + line.start.y;

    result2.x = (t+dt)*dx + line.start.x;
    result2.y = (t+dt)*dy + line.start.y;

    return INTERSECTION;
  } else if (lec == circle.radius) {

    result1.x = ex;
    result1.y = ey;

    result2.x = ex;
    result2.y = ey;

    return TANGENT;
  }

  return NO_INTERSECTION;
}