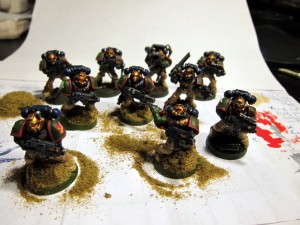
![]() Having just finished a squad of Tactical Marines and some painting notes to go with them, I thought I’d post my basic color arrangement so that I have it archived for future reference. That seems like a good, simple practice to really help consistently painting an army over time. I will confess that I do have one half squad of Marines in my army that don’t quite match the others because I wasn’t paying attention and straight up forgot to switch to my usual color for the shoulders and arms…
Having just finished a squad of Tactical Marines and some painting notes to go with them, I thought I’d post my basic color arrangement so that I have it archived for future reference. That seems like a good, simple practice to really help consistently painting an army over time. I will confess that I do have one half squad of Marines in my army that don’t quite match the others because I wasn’t paying attention and straight up forgot to switch to my usual color for the shoulders and arms…
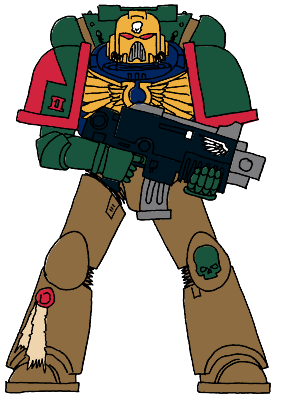
My Kingbreakers army originated with an inkling of a chapter of Marines more or less founded out of a heavily wooded planet, Forestway. This was actually inspired by a great painting a former roommate had hanging in our kitchen of a dark, overgrown forest and a vague, shadowy path through the woods. To go along with that foundation fluff notion, I wanted a color scheme that had several colors—the Marines are good for patterns and big color blocks—but was somewhat muted, with heavy earthy tones. After playing around with some of the online Marine painting tools, I eventually came up with this draft in GW’s tool, which is apparently not online anymore:
 Some of the colors have shifted a little bit as I’ve used different paints, tried some inks, started using more washes, etc., but in general I remain very happy with this basic arrangement and a few variants for HQs, Veterans, and so on. The following is the full rundown on my basic paint outline, roughly in the order I usually follow. Unless noted otherwise, these are GW paints and colors. My core colors however are from P3 mostly due to happenstance; I used to frequent a Privateer-dominated store and just wound up getting them from there one day when I was ready to start.
- Legs: P3 Hammerfall Khaki
- Arms & shoulders: P3 Ordic Olive
- Body & pack: P3 Exile Blue
- Gun muzzles, clips, leg and knee joints, tubes, some helmet grills: Boltgun Metal
- Shoulder trim: Mechrite Red
- Chest plate, stomach power coils, weapon badge, helmet: Dwarf Bronze (2 coats)
- Belts, pouches, holsters: Scorched Brown
- Highlight/edge belts, pouches, holsters: Snakebite Leather
- Gun body: Chaos Black
- Should Insignia: Skull White
- Purity seals and parchments:
- Wax—Mechrite Red
- Paper—Dheneb Stone or Bleached Bone
- Paper highlight—Skull White
- Writing—Chaos Black or Scorched Brown
- Highlight chest plate, weapon badge, helmet: Burnished Gold
- Eye base: Mechrite Red
- Drybrush gun body: Shadow Grey
- Body and pack second coat: P3 Exile Blue
- Shoulders and arms second coat: P3 Ordic Olive
- Legs second coat: P3 Hammerfall Khaki
- Highlight/edge pack and chest: Midnight Blue, Enchanted Blue
- Highlight legs: Bleached Bone or Dheneb Stone (bring out edges, joints, etc)
- Wash legs: Gryphonne Sepia
- Wash body and pack: Asurmen Blue
- Backpack details: Boltgun Metal (important to do after pack wash)
- Wash chest plate, weapon badges, guns, blades, helmets, backpack details: Badab Black
- Iris of eyes: Blood Red (important to do after washing helmet)
- Apply shoulder decals
- Wash shoulders, arms: Thraka Green
Most of my marines have Kingbreakers icon shoulder decals, shown in the top right of this post. Without any clear inspiration, another foundational idea for my chapter that developed at some point is that one of their first missions involved dethroning—and in the process obliterating—a heretic king and his dominion. From that came the “Kingbreakers” moniker and the icon. I whipped up the latter in Illustrator based on some artwork I had made previously and printed it out on decal paper. The latter is somewhat of a hassle to acquire and not particularly cheap (it’s the shipping that kills), but worth it. The effect of that custom iconography on the look of my units is great, really boosting the uniqueness and ownership. I use MicroSol and MicroSet to apply them. A good writeup on working with custom decals is online at BoLS.
At the moment my least favorite process is painting the arms. For some reason they’re just always a hassle and the most fiddly bit. Looking to improve in the future, I need to move around some of my highlights and do more after the washes to bring the colors back out. I could also stand to put in more details, even just with some Boltgun Metal, of the arm panels, joints, etc., which I tend to skip.
However, long story short, that is how I do up my Kingbreakers, little by little!
